How can I create a new eLesson with eLML and use it?
This section aims at providing a rudimentary guide for the creation of an eLesson with the eLML structure. It is both a technical guide for creating a new project and shows how an eLesson may be structured from the content point of view.
The technical stuff: How to create a new lesson
The technical stuff: How to create a new lesson
Please note that if you downloaded the stable version, the MyProject-files are already part of the package. This means that you have to do step 1 to 3 only if you work with the developer release.
- In your Eclipse workspace (where the "core" folder resides) create your project folder named "MyProject".
- Download the MyProject.zip file (ZIPZIP file that includes the basic folder structure for a new project) and unzip it.
- Import (choose from context menu in Eclipse) or drag&drop the three folders "_config", "_templates" and "MyLesson" within your project "MyProject".
- Rename the folder "MyLesson" and the file "MyLesson/en/text/MyLesson.xml" using your lesson label. Please note that the lesson folder should be named the same as your lessons label attribute (lowercase, less than 11 digits, no special signs etc.). (To rename use the context menu while clicking on the folder or file)
- Rename the language folder "en" to "de", if your lesson is in German, to "fr" if your lesson is in French etc. Use the ISO 639 two-digit (Alpha-2) standard to define your language.
- Open the "_config" folder and adapt the two files according to your needs. The config.xml is used to define your transformation (XSLT) parameters and the validate.xsd is needed for customization of the eLML XML Schema. You have to add the lesson label you created in step 4 to your validate.xsd file to the "PredefinedLabelsType" element, else your new lesson wont be valid.
- If you want to create multiple lessons, we suggest to duplicate (many times, if needed) the "MyLesson" folder and rename it.
If you prefer to create your own XML file, make sure that the lesson root element contains the following attributes:
<lesson label="lessonlabel" title="My Lesson Title" xmlns:xsi="http://www.w3.org/2001/XMLSchema-instance" xsi:schemaLocation="http://www.elml.ch ../../../_config/validate.xsd" xmlns="http://www.elml.ch">
From this point on your XML editor should show you interactively the available eLML elements and you should be able to transform your lessons as shown in the transformation examples.
The content: First thoughts about an eLML eLesson
The content: First thoughts about an eLML eLesson
Assuming that you already have a topic about which you want to create a lesson and you know what your students shall be able to learn (goals/objectives), you should first think about the amount of material covered by this topic. It is recommended that an eLesson represent in size about 1 to 2 face-to-face lectures. The student should need at most 2 hours to work through the material provided. Therefore, you will have to decide if your topic is about right in size, if you need to extend it or if it might be sensible to split it into two or more separate lessons (each of them, for example, highlighting one specific aspect of the topic).
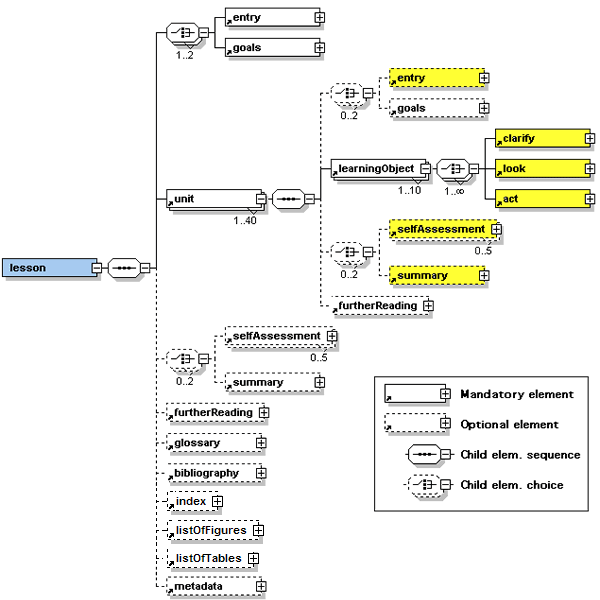
Then, a lesson can be substructured into up to 40 units which should all be about the same size. Additionally, you'll have to think about the structure of the unit. A unit is structured according to the ECLASS scheme and can consist of up to 10 learning objects. A single learning object deals with one small aspect of the topic in a threefold way. Ideally, it teaches this aspect with a clarify, a look and an act part. It is up to you in which sequence you use these parts and to decide if it is necessary to use one part twice.
Another important part of this first phase of creating an eLML eLesson is to think about short and meaningful titles that each lesson, unit and learning object should have.
What is described above is not always that easy in practice. Have a look at the following figure which shows the structure of a lesson. You may want to create a simple text file which has several subheadings representing the different parts of lesson. In this text file you can write your first thoughts and notes about the lesson and units and outline what (more or less) the units should contain.
 A detailed view of the eLML structure
To give an actual example, let us assume we want to create a lesson which gives an overview about the Virtual Reality Modelling Language VRML. In about two hours time we might be able to give a short introduction to VRML and show and maybe explain a simple VRML scene. The text file could be structured as follows (please note that the content written here are first thoughts and might need revision at a later stage):
| Lessontitle: | First Glance At VRML |
|---|---|
| Entry: | why was this lesson created, what will it teach |
| Goals: | - students know what VRML is and where it originates from - students have looked at a simple application of VRML and understand it |
| Unit1 – Title: | Overview and Background of VRML |
| Entry: | introduction to this unit |
| Goals: | - students know… (do not repeat lesson goals but refine them at unit level or skip them) |
| LearningObject: | Title: What is VRML? |
| Clarify: | explain what it is, where it can be used, advantages, disadvantages (Remark: This is all combined in one clarify because this is only an overview lesson, we could also create a more detailed lesson called 'What is VRML?' and then have these topics as separate learningObjects or even separate units.) |
| Act/Look: | install VRML Viewer, look at different examples of VRML use (Remark: This example shows that it is not always easy to distinguish exactly between the three parts clarify, look and act. Here, the parts act and look are combined in one part (later called either act or look). This is a possible and valid solution.) |
| LearningObject: | Title: Where does VRML originate from? |
| Look: | A figure showing the history and development process of VRML |
| Clarify: | Further explanations not included in the figure |
| SelfAssessment: | Some questions about the content of the unit, students can optionally share their findings in a discussion board |
| Summary: | summarise |
| Unit2 – Title: | Simple Application of VRML |
| ... | |
| SelfAssessment: | Flash quiz with questions about this lesson |
| Summary: | Summarise and conclude the lesson, eventually give some outlook for further use of VRML |
| Glossary: | Make notes of all terms in this lesson that will need to be explained in the glossary. |
| Bibliography: | Here one writes whatever resources one used to create the lesson. Try to do it while creating the lesson, so you won't have to think about it at the end. |
This might, hopefully, give you some idea how you could start structuring and creating an eLML eLesson.
Tips and Tricks for creating good eLessons
Tips and Tricks for creating good eLessons
Some of the following Tips and Tricks apply to eLearning in general while others are specific to the eLML structure. More information about eLearning in general can be found on various websites and in books. Some of them are listed in the reference section of this documentation.
- Structure your lesson quite in detail before you start writing actual content using the XML structure. The structure above might even contain ready-made sequences of text and graphics before you start writing in XML. This is recommended as it is easy to loose the overview and good structure of the lesson when starting to dig into details too early.
- Having short and meaningful titles for lessons, units and learning objects helps you and the student.
- Try not to copy a textbook. Think about look, act and self assessment parts that enable the student to interact with the material and to learn more deeply. This part is very important in eLearning and should also allow the students to collaborate, share their work and build a community of learners.
- Look at the XML structure as a help and guide and not as a straitjacket. The structure should help you create good eLearning material and not hinder you. With some experience you will figure out the structure is much less constraining than you first thought. Actually, it is possible to develop material for many different learning scenarios within this structure. Let your imagination run wild.
- Write short, clear and meaningful sentences and paragraphs. The students learn the material on the screen and have no direct means to ask if they cannot understand the content.
- Use the explanation of XML elements in Content elements chapter to understand what each element means, how it is used and how it is displayed in the standard layout.
- Create detailed metadata for your lesson. This helps you when looking later at the same lesson and gives tutors the needed information when assembling courses from different lessons.
- The bibliography section allows you to list all the resources you have used to create the lesson. Keep the further reading section short and list only the resources that are and especially recommended for reading by the students.
Presenting the final lesson to your students
Presenting the final lesson to your students
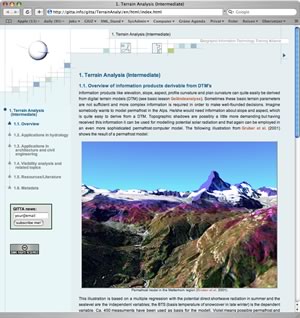
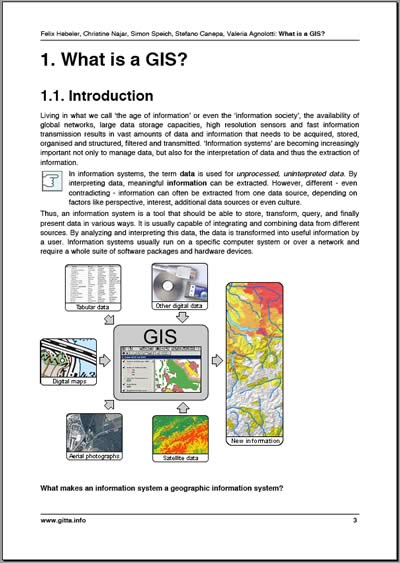
The simplest way to use lessons generated with eLML is to transform them into a set of standalone XHTML files. Using the Template Builder and the included XSLT files you can generate both one and multiple output XHTML pages or a PDF version (or other output formats) of your lesson. In the latter interactive elements like Flash animations are not visible. These files can be stored on a regular web server or put an a CD and distributed to your students. An individual layout can be created as described in this manual. An example of a standalone GITTA lesson is shown below:
 Screenshot of a GITTA lesson as a standalone XHTML page.
 Screenshot of the same GITTA lesson as PDF document.
You can also integrate your lessons within a learning management system (LMS)learning management system (LMS) like OLAT, Moodle or WebCT. You will have to create either an IMS Content PackageIMS Content Package or SCORM moduleSCORM module as described in the IMS/SCORM chapter.